

How to Clean a Dryer Vent in 7 Simple Steps | Premier Cooling LLC

How HVAC Filters Impact HVAC Performance in Weston, FL
June 10, 2025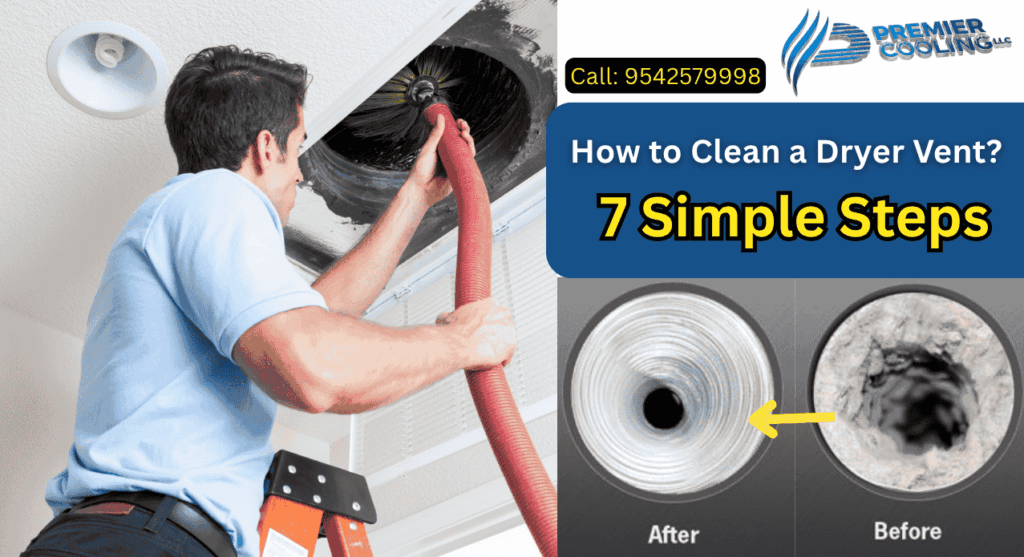
Dryers are essential at home, but did you realize discoloring of the dryer vent may cause great harm, such as fires in the house, high energy bills, and low performance of the appliances? So, if you’ve asked yourself, “How do you clean your dryer vent?” or “How to clean a dryer vent at home safely?”, then you are in the right place. Premier Cooling LLC cares about your safety and the efficiency of your home; hence, we’re sharing a simple and complete guide on cleaning your dryer vent in 7 easy steps.
Why Dryer Vent Cleaning is So Important
Every time you use your dryer, tiny bits of lint, fibers, and debris escape the lint trap and get stuck in the venting system. Over time, this accumulation reduces airflow, making the dryer work harder and longer to dry your clothes. This not only shortens the lifespan of the appliance but also poses a serious fire risk.
The U.S. Fire Administration reports that nearly 2,900 home fires are caused by clothes dryers annually, and most of them result from dirty vents. Cleaning your dryer vent regularly can prevent such disasters and improve your dryer’s efficiency.
You might be wondering, how much does it cost to have a dryer vent cleaned professionally? On average, it can cost depending on the size of the home, the length of the ductwork, and the condition of the vent. It’s a small price to pay for your family’s safety and peace of mind.
How to Clean a Dryer Vent in 7 Simple Steps
Want to do it yourself before calling the professionals? Follow these steps to safely clean your dryer vent:
1. Unplug the Dryer
For starters, safety plays paramount importance. Unplug the dryer from the outlet. If it is a gas dryer, make sure the gas supply is shut off to prevent any possible leaks.
2. Move the Dryer Away from the Wall
Carefully slide the dryer away from the wall so that the back area, where the vent is, may be reached. Drop a furniture slider or cardboard underneath the dryer so that the floor won’t get scratched.
3. Detach the Vent Hose
Identify the dryer vent hose–usually a flexible silver duct. Loosen the clamps or pull off any tape binding the hose onto the dryer and the wall. Carefully separate the hose from the dryer and from the vent inside.
4. Vacuum Inside the Hose and Wall Vent
Use the vacuum cleaner with the longer hose attachment to suck out from inside the vent hose. Reach as far into the wall duct as you can to remove lint, dust, and debris causing blockage. Proceed thoroughly since most of the buildup takes place here.
5. Use a Dryer Vent Brush for Deep Cleaning
A dryer vent cleaning brush kit can be quite helpful in breaking down and pulling out stubborn lint inside the duct. Insert the brush, rotate it as you push forward, then slowly pull it back out. Repeat a few times to ensure a complete cleaning.
6. Clean the Outside Vent
Go outside of the house to where the dryer vent exhausts. Remove the vent cover and check for any blockages, bird nests, or lint build-up. Clean around the vent opening and make sure that the flap opens and closes freely.
7. Reconnect Everything and Test
After cleaning, securely reattach the vent hose and tighten the clamps. Carefully push the dryer back into place without crushing the hose. Plug in the dryer or turn on the gas. Run a short drying cycle to make sure that everything is working well and that air is freely flowing from the vent.
Signs Your Dryer Vent Needs Cleaning
Even if you follow the steps above, it’s important to recognize when it’s time for a professional touch. Here are some signs your dryer vent may be clogged:
- Clothes take longer than usual to dry
- Dryer feels hot to the touch after use
- A musty or burning smell during cycles
- Excessive lint behind the dryer
- Vent flap outside doesn’t open properly during use
If you notice any of these, it’s best to stop using the dryer and call a vent cleaning professional.
Choose Premier Cooling LLC for Professional Dryer Vent Cleaning services in Florida
DIY cleaning will help to an extent, but sometimes that does not reach the build-up in the ductwork itself. That is where Premier Cooling LLC comes in. Our professional technicians use high-powered tools and inspection equipment to provide a thorough, safe, and affordable dryer vent cleaning service in West Palm Beach and beyond. Call Premier Cooling LLC at 9542579998 to set up a service or visit our Website for a free quote.

